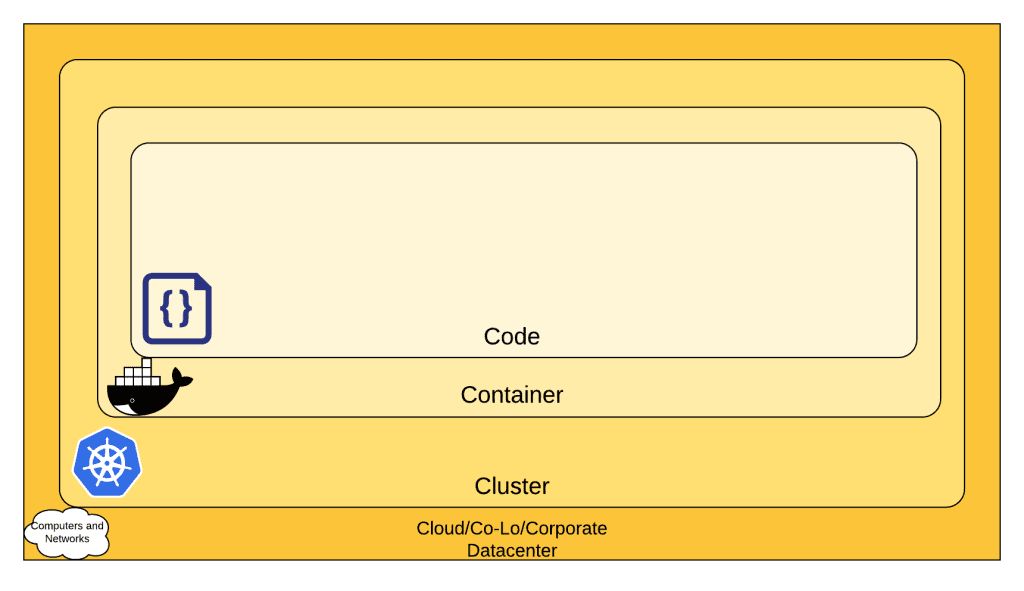
It’s not an exaggeration to say that Kubernetes revolutionized how we approach software development in the past couple of years. With the rising popularity of containers and microservices architecture, Kubernetes has proved to be a perfect tool for managing application deployment and scaling. Despite this widespread use of Kubernetes as the choice container orchestration solution, however, the security concerns over the platform are growing louder every day.
The majority of these security issues are not caused by inherent shortcomings in Kubernetes itself. Rather, they result from the lack of knowledge organizations have on using suitable configuration options to eliminate system vulnerabilities. In fact, 59% of the Kubernetes-related security issues are attributed to misconfigurations.
If you are hoping to use Kubernetes to deploy your containerized applications, you too will have to figure out what security configurations Kubernetes provides and how to cohesively use them in your system at some point. This post intends to give a few tips as answers to these questions to help you get started with securing your Kubernetes clusters. Without further delay, then, let’s get started.
Take maximum benefit of built-in RBAC mechanism
RBAC, or Role-Based Access Control, is enabled by default in Kubernetes to control the actions users and services can perform within the system. However, you still have to carefully contemplate the permissions granted to different roles to prevent unauthorized personnel from accessing the cluster and its components.
As a rule of thumb, follow the principle of least privilege when defining user roles in your system. It ensures no user gets more permission than those that are absolutely necessary. Additionally, you can define namespace-based permissions—instead of cluster-wide ones—to limit the area within which the user can perform these actions. Even after the roles tied to the Kubernetes cluster are defined, you should be conservative when assigning high-privilege roles to users and services.
When granting permissions to different roles, it’s important to note that certain user permission combinations in Kubernetes can lead to unintended privilege escalations. For example, if you don’t want a particular user to create pods in the cluster but intend to permit deployment creations, it indirectly results in the user acquiring the pod creation permission as well. To avoid running into situations like this, test the defined user roles against different scenarios to verify them beforehand.
Have a good network policy in place
Kubernetes network policies allow you to restrict communication among pods and namespaces within a cluster. For example, if your application frontend queries the database via a data management service, restricting direct communication between the frontend and database protects your data even if an attacker gains access to the frontend.
Managed Kubernetes providers like Google and Oracle come with integrated network policies with quick opt-in options. When manually setting up Kubernetes, you can write your own network policy similar to the following example.
| apiVersion: v1 kind: NetworkPolicy metadata: name: database spec: podSelector: matchLabels: name: database ingress: – from: – podSelector: matchLabels: name: datamanager |
The above policy restricts access to the database to pods with “datamanger” as the name.
Alternatively, you can employ a Container Network Interface (CNI), like Flannel, Calico, Weave, to simplify the process of setting up a network policy for your Kubernetes cluster.
You can also extend the network policy to block irrelevant external IPs, open up only the required ports, and accept only TCP traffic to further guarantee system security.
Secure the etcd from unauthorized accesses
At Kubernetes, etcd stores some of the most critical cluster-wide data such as configurations, metadata, and state information. An attacker managing to infiltrate the etcd can compromise the security of the entire cluster without resistance. Due to this reason, protecting the etcd should become a priority in any security strategy you develop for Kubernetes.
Ideally, only the API server should be able to access the data stored in etcd. You can set up a firewall or use its built-in public key infrastructure to prevent unauthorized nodes and pods in the cluster from sending requests to etcd. It provides separate peer and client key pairs to identify between etcd members and clients. To restrict client communication to only the API server, you can establish a TLS authentication procedure in the system.
As an additional security measure, you should encrypt etcd data to prevent attackers from reading them even if an attack becomes successful. Rotating the encryption key after a specific amount of time helps you retain the unpredictability of the encryption mechanism.
Make it difficult to break out of the container
One of the most common threats to Kubernetes security is the possibility of an attacker breaking out of a container to access other containers or the host. Therefore, it’s imperative to take necessary measures to ensure that the user actions cannot extend beyond their container environment. Some of the basic steps you should follow to minimize the chance of such an event occurring include:
- Run your application in the container as a regular user instead of a root user.
- Make the root file system read-only. In cases the application wants to allow users to upload or modify files, use a temporary directory or an external volume while keeping the file system’s read-only status intact.
- Prevent the application from granting or escalating new privileges.
The below example shows a pod with these three security configurations defined.
| apiVersion: v1 kind: Pod metadata: name: secure-pod spec: securityContext: runAsUser: 1000 readOnlyRootFilesystem: true allowPrivilegeEscalation: false |
Sandbox untrusted workflows
Sandboxing adds an additional security layer around containers and pods to tighten their isolation from other processes running in the host. It limits the attackers’ ability to break out of a container to access the OS and escalate privileges. In Kubernetes, you can sandbox untrusted or untested application components, especially those provided by third parties, to prevent them from compromising the entire system’s security
Examples of popular Kubernetes sandboxing tools include gVisor and Kata Containers. gVisor intercepts all system calls to the host OS kernel and handles them within the dedicated user space. On the other hand, Kata containers use lightweight VMs to solidify the isolation of untrusted workflows.
General tips on securing Kubernetes clusters
Other than the specific configurations discussed in previous points, you can also use security practices applied in software development as a whole to protect Kubernetes as well. These practices include:
- Regularly updating Kubernetes to the latest version released to the market. This includes new patches with bug fixes and version updates with modified security features.
- Limit the attack surface by opening only the most necessary endpoints to the outside users and reducing the number of vulnerable software in the application.
- Turn on logging and auditing to help you flag unusual user behavior and hacking attempts.
Alternatively, if you choose to rely on a managed Kubernetes service provider like Google or Oracle, you’ll receive most security measures we discussed in this post as out-of-the-box features. It provides a perfect solution to organizations who want to enjoy the benefits of Kubernetes but lack technical experience working with the tool to set up a fail-proof security strategy.
Takeaway
Whether you’re setting up your own Kubernetes cluster or relying on a third-party service provider, security should become a primary focus of the development strategy you follow. We hope the knowledge you gained in this post will help you start moving in the right direction to build a solution that brings out the actual power of Kubernetes without hidden pitfalls.
Visit the previous blog: AI Application in IT Service Management (ITSM)